If you work across multiple Google Workspace domains—say, one for your main company and another for a subsidiary or client—you know the friction: flipping between accounts, missing emails from the other inbox, having to remember which address to send from.
There’s a pattern for this. It’s sometimes called a “God Account” or “master account.” You set up one email as your central hub, pull in mail from all your other addresses, and then send as those addresses directly. Gmail thinks you’re logged into each one, but you’re not bouncing between tabs.
Here’s how.
The Setup: Three Pieces
You’re doing two things: pulling mail in (so you see everything) and sending as (so replies go from the right address). They work independently, so you can mix strategies.
1. Fix Admin Settings First
This is the blocker most people hit. You need to let Gmail do two things it normally restricts: automatic forwarding and per-user SMTP auth.
Log into admin.google.com as the admin of the main domain, then navigate to:
Apps → Google Workspace → Gmail → End User Access
Enable these three:
- POP & IMAP (you’ll need this for the pull-in step)
- Automatic forwarding (lets users set up auto-forward)
- Allow per-user outbound gateways (this is the one that matters—it lets you send as external addresses)
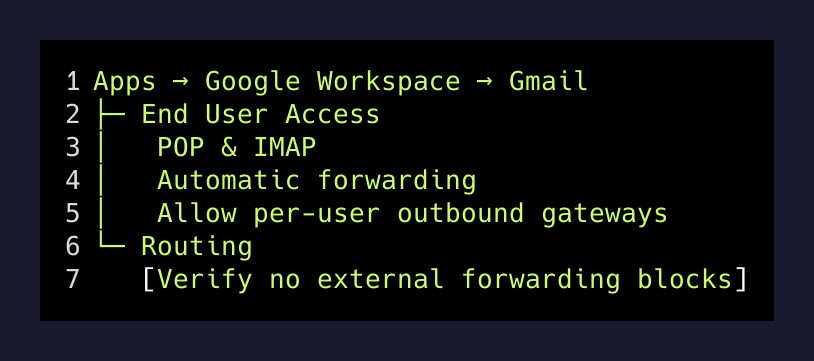
Then go to Apps → Google Workspace → Gmail → Routing and make sure no rule is blocking external forwarding.
Important: If you have multiple Workspace domains involved, repeat these steps in each domain’s admin console. You need forwarding enabled on all sides.
If you don’t have admin access to all the domains, you’re not stuck—you can still pull mail via POP3 (slower, but doesn’t need admin permission). But the faster path (automatic forwarding) needs the admin on the source domain to flip that toggle.
2. Pull Mail In
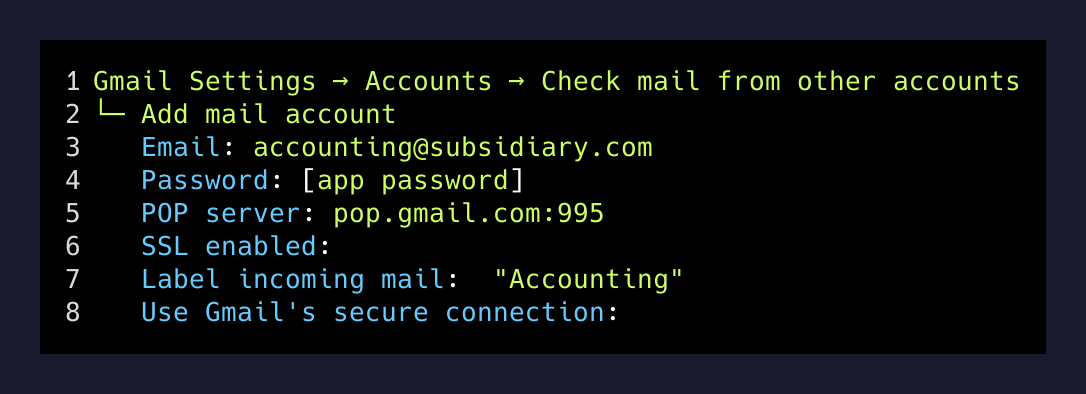
Let’s say you want to consolidate three work accounts into one master email. In your master account (Gmail) → Settings → Accounts → Check mail from other accounts → Add a mail account:
For each source account, you have two options:
Option A: Gmailify (if you haven’t already linked them)
- Gmail offers “Gmailify” for Google accounts. Use this if available—it syncs labels and spam filtering.
Option B: POP3
- Server:
pop.gmail.com:995 - Port: 995 (SSL on)
- Username: the full email address of the source account
- Password: an app password from that source account (not your regular password)
Generate app passwords at myaccount.google.com → Security → 2-Step Verification → App passwords.
Check the box “Label incoming messages” so you can tell which inbox they came from.
Faster alternative: If admin allowed automatic forwarding on the source domain, just go to each source account → Settings → Forwarding and POP/IMAP → Forwarding and set it to forward to your master email. Pick “keep a copy in Gmail” or “delete after forwarding” depending on your preference. Instant, and you can still see the original label.
3. Send As Those Addresses
Now your master inbox sees all the mail. But when you reply, Gmail defaults to sending from your master address. You want replies to come from the original sender.
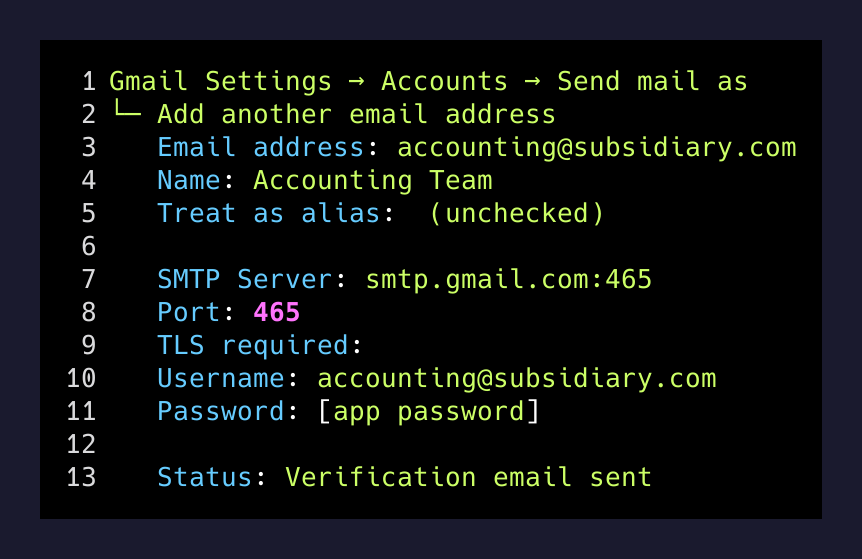
In your master account → Settings → Accounts → Send mail as → Add another email address:
- Uncheck “Treat as alias” (important—this tells Gmail to use SMTP, not just relabel)
- SMTP server:
smtp.gmail.com:465 - Port: 465 (SSL on)
- Username: full email address of the source account
- Password: app password (same one you generated for POP3)
Gmail will send a verification email to that address. Since you’ve already set up the pull-in or forward, it’ll land in your master inbox. Click the verification link, and you’re done.
Repeat this for each address you want to send from.
Order of Operations
- Admin first. Fix the toggles in all Workspace admin consoles.
- App passwords. Generate one for each source account at myaccount.google.com.
- Set up “Send as” before inbound. The send-as setup sends a verification email—proving your forwarding/pull-in is working.
- Then set up the pull-in. Either POP3 or automatic forwarding.
This order matters because if send-as fails due to a missing app password or invalid SMTP config, you’ll know immediately.
The Payoff
After this, your workflow changes:
- You open Gmail once. (Your master account.)
- You see all incoming mail, labeled by source.
- When you reply, you pick which address to send from—no bouncing between tabs, no missing emails.
- Your phone app syncs the same account. One place to check everything.
If you ever need to switch to a different master account, you can re-point the forwarding or POP3 setup. It’s reversible.
The pattern works at any scale—two domains, five domains, doesn’t matter. The admin settings are the hardest part. Once those are unlocked, the rest is just config.
One last thing: If the “Allow per-user outbound gateways” toggle is off and you can’t flip it (not an admin), you can still make this work—just use automatic forwarding on the source side and POP3 pull-in on the master side. Slower, but it avoids needing SMTP auth to send as external addresses. Check with your Workspace admin about what’s possible in your setup.